Introduction
Scope
Implicit FrontEnd consists of two components:
Implicit FrontEnd Add-in
Implicit FrontEnd Add-in provides a side-panel inside Outlook and allows you to view relevant CRM data in real-time as you receive and send emails to your customers and prospects. Furthermore, it enables you to browse, search, view, update and create new CRM records from Outlook as well as archive emails to records in the CRM. Implicit FrontEnd Add-in is installed on your Microsoft 365 account (personal or corporate account) or on your Exchange mailbox.
Implicit FrontEnd Desktop App
Implicit FrontEnd Desktop App is installed on your Windows desktop and runs as a taskbar application. It allows you to keep your CRM calendar and contacts in full sync with Outlook and set rules for auto archiving of emails from Outlook to the CRM.
This guide is intended for IT, Microsoft 365 or Exchange administrators and provides detailed instructions on how to install and configure Implicit FrontEnd add-in and desktop app. It is divided into two sections:
• Installation / configuration by Microsoft 365 / IT administrator (or on-prem Exchange admin)
• Installation / configuration by the CRM admin
Trademarks
Implicit, the Implicit Logo, Implicit FrontEnd, Implicit for Teams, Implicit for Outlook and combinations thereof are trademarks of Implicit Inc.
Microsoft, Microsoft Office, Microsoft Outlook, Microsoft Teams, Microsoft 365, and Windows are registered trademarks of Microsoft Corporation.
SugarCRM is a registered trademark of SugarCRM Inc.
SuiteCRM is a registered trademark of SalesAgility Ltd.
Other product names used in this publication are for identification purposes only and may be trademarks of their respective companies.
Disclaimer
The contents of this document are provided in connection with Implicit Inc. (“IMPLICIT”) and Implicit FrontEnd product. IMPLICIT makes no representations or warranties with respect to the accuracy or completeness of the contents of this publication and reserves the right to make changes to specifications and product descriptions at any time without notice. No license, whether express, implied, arising by estoppel, or otherwise, to any intellectual property rights are granted by this publication. Except as set forth in Implicit FrontEnd License Agreement, IMPLICIT assumes no liability whatsoever, and disclaims any express or implied warranty, relating to its products including, but not limited to, the implied warranty of merchantability, fitness for a particular purpose, or infringement of any intellectual property right. IMPLICIT’s products are not designed, intended, authorized or warranted for use as components in applications intended to support or sustain life, or in any other application in which the failure of IMPLCIT’s product could create a situation where personal injury, death, or severe property or environmental damage may occur. IMPLICIT reserves the right to discontinue or make changes to its products at any time without notice.
Supported Platforms
Microsoft Outlook
- Microsoft 365 or Microsoft Exchange (2013 and higher)
- Microsoft Outlook on Windows (Windows 11, Windows 10, Windows Server 2019, Windows Server 2016, Windows Server 2012 R2)
- Microsoft Outlook for Mac (macOS 10.14 Mojave or later).
- Microsoft Outlook Online (Microsoft Edge, Google Chrome, and Safari).
- Mobile: IOS and Android devices
CRM
SugarCRM and SuiteCRM.
Installation Steps
The Implicit FrontEnd installation process involves both the CRM Administrator and the Microsoft 365 / Exchange / IT administrator. It can be done by end users but require admin privileges on both CRM and 365/Exchange.
1. Installing Implicit Module on your CRM instance
These steps require CRM Admin privileges:
- Start by installing the Implicit FrontEnd Module on the CRM Server – This is required for the Implicit side panel to show up in Outlook or in a web browser.
- If you are using SuiteCRM – Install the required SuiteCRM patches
- If you are using SugarCRM – Add the Implicit platform to the list of SugarCRM API platforms. Go to SugarCRM Admin > ‘Configure API Platforms’ (under the ‘Developer Tools’ section) and add ‘ifo’ and ‘ifo365’ to the list of ‘API Platforms’.
2. Installing Add-in on your Microsoft 365 Account
These steps require Microsoft 365 Admin privileges:
- Start by granting permissions on behalf of the organization for users to use the Implicit FrontEnd Desktop App.
- Install Implicit FrontEnd add-in on Microsoft 365 or Exchange on-prem.
- After you install the add-in on your Microsoft 365 corporate account, it might take from 24 hours to several days to show up on users’ Outlook.
3. Installing Implicit Desktop App
This first-time installation and configuration should be done by the CRM Admin on a Windows desktop:
- When the Implicit FrontEnd add-in shows up in Outlook, click the button to open the side-panel and follow the steps to go through the Initial Configuration Wizard.
- You will be prompted to accept the End user License Agreement (EULA) and provide the license key. It will then prompt you to download the Implicit Desktop App. Click the download button and run the installation. Please follow the instructions to install the Implicit Desktop App.
- Once the installation is complete, proceed to configure the Desktop App and then publish your configuration to all users. This will eliminate the need for all users to configure the software themselves.
- Once you’ve published the configuration to all users, go back to Outlook side-panel and click the ‘Proceed’ button. The add-in should now detect the Desktop App and complete the side-panel configuration.
Microsoft 365 Admin Installation
Granting Permissions for Implicit FrontEnd Desktop App
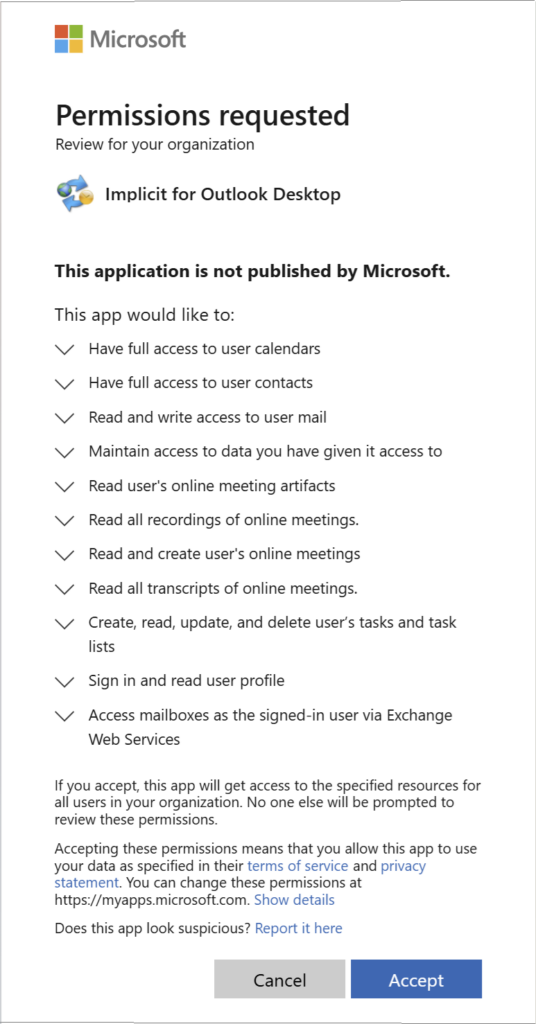
Before users can install and run the Implicit FrontEnd Desktop App, you need to grant them permission to do so on behalf of your organizations. The desktop app focuses primarily on synchronizing contacts and calendars meetings and between users’ 365 mailboxes and the CRM and on auto-archiving of emails from users’ mailboxes to the CRM. As such, it requires the following list of access / permissions:
If you are the Microsoft 365 admin and have access to the Microsoft 365 corporate account, you can grant the required permission by clicking on the following link:
https://services.outlook-integration.com/ifoapprove.aspx
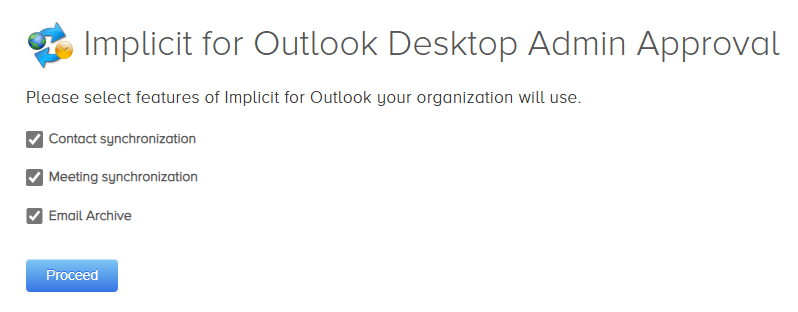
You will be prompted to login to 365 admin account and select the functionality you intend to use: contact sync, meetings sync or email archiving. Your selection will determine the required 365 permissions. After making you selection, click ‘Proceed ‘. You will then be prompted to approve the permissions via the above page. If you accept and agree to grant these permissions, click Accept. Otherwise click Cancel.
Installing Implicit FrontEnd Add-in on Microsoft 365
This section outlines the step-by-step process for deploying Implicit FrontEnd add-in organization-wide using the Microsoft 365 admin center.
1. Sign in to Microsoft 365 Admin Center
Sign in with your administrator credentials to Microsoft 365 Admin Center by going to https://admin.microsoft.com.
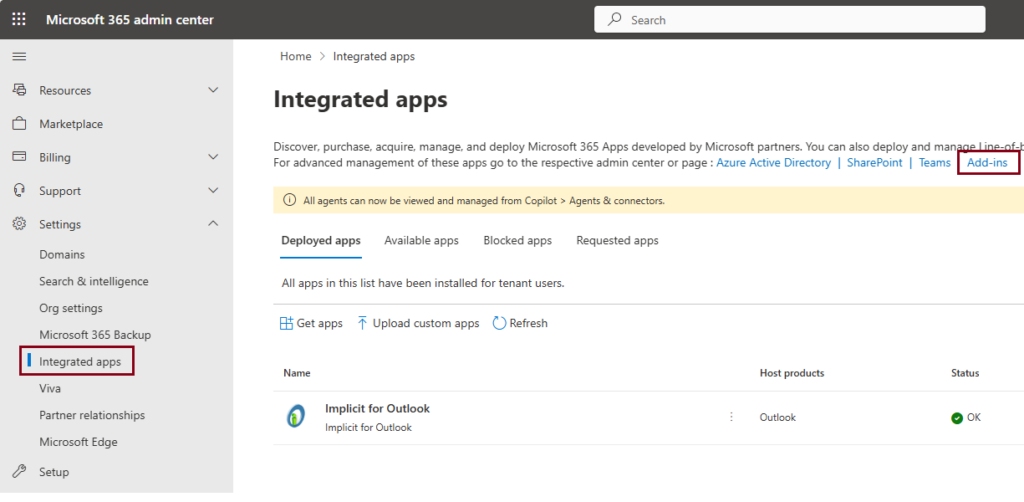
2. Access Integrated Apps
In the left-hand navigation panel, expand Settings and click ‘Integrated apps’.
3. Click ‘Add-Ins’
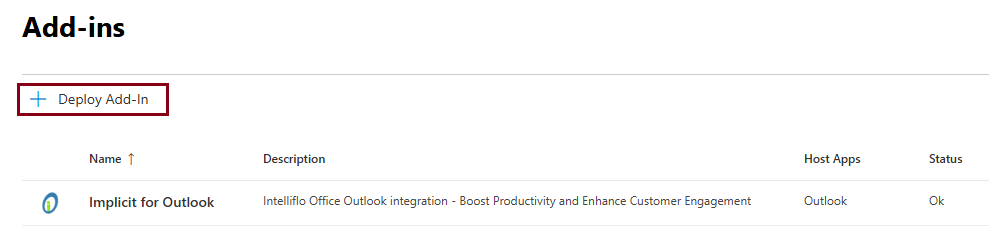
4. Click ‘+Deploy Add-In’
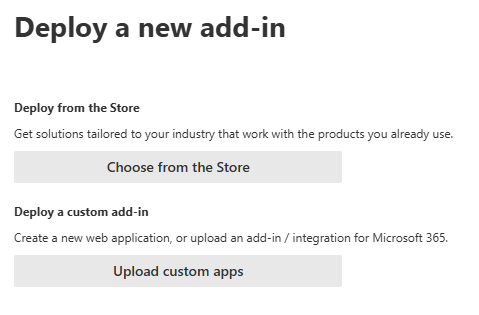
5. Deploy New Add-In
On the ‘Deploy New Add-In’ screen – select ‘Upload Custom Apps’
6. Select “I have a URL to a manifest file”
Next, select ‘I have a URL for the manifest file’ and enter the following URL:
https://apps.outlook-integration.com/ifo/manifest.xml
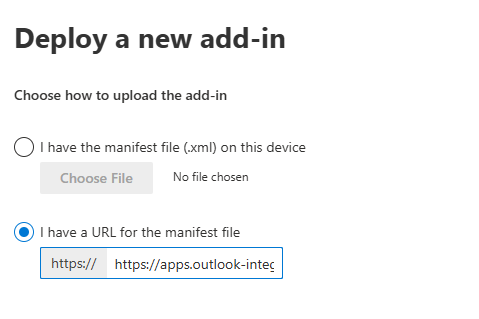
Important Microsoft 365 user interface is a little confusing as it implies that “https://” is included but it expects you to include the “https://” in the URL that you enter.
- Next, select the users who will have access to Implicit FrontEnd and set the deployment method to ‘Fixed’.
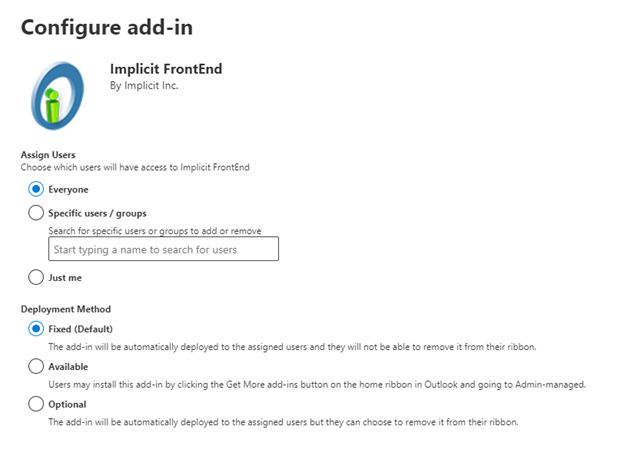
- Click ‘Deploy to deploy the add-in.Implicit FrontEnd is now installed on your Microsoft 365 corporate account. The next step is to confirm that the installation was successful, and the app is available in users’ Outlook.
Confirming the Installation
Note: It can take up to 24 hours for Microsoft 365 to refresh itself and for the Implicit FrontEnd app to appear on the ribbon in Outlook and as an available App in a browser for Outlook online.
Sign in to Microsoft Outlook as a user. If you are already signed in, please sign out and sign in again.
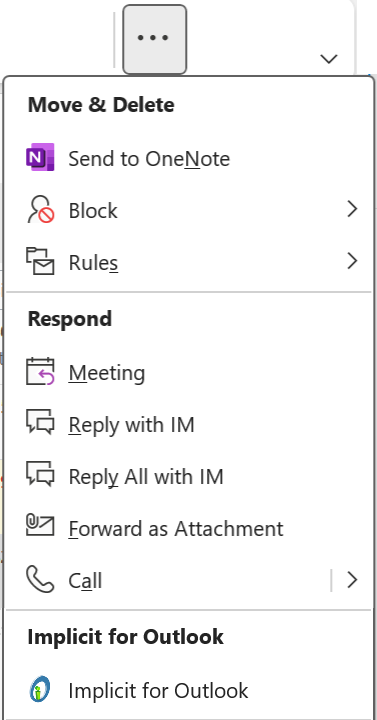
When Implicit FrontEnd has been deployed to Outlook, it will appear on the ribbon in Outlook as shown below:

Note: Depending on the number of buttons you have configured on your Outlook ribbon, the Implicit button may also show up on the ‘More Commands’ (‘…’) button as show below:
Network-based Silent Installation of Implicit Desktop App
If your organization requires admin privileges to install software on the desktop, install the Implicit Desktop app on users’ desktops. We recommend that you start with the CRM admin’s desktop and then proceed with installing it for other users.
Implicit FrontEnd Desktop App is installed on users’ desktops and runs as a Windows taskbar application. Two different installation packages are provided:
- Executable installer – Can be installed by users or by IT admins if users do not have permissions to install software on their desktop. To install the executable installer on the local machine either as user or as admin, please refer to the installation instructions at: https://www.outlook-integration.com/docs/implicit-frontend-user-guide/#implicit_for_outlook_desktop_app
- Admin MSI installer – Can be installed silently over the network for a pre-defined group of Implicit users. This process typically involves a software deployment tool such as Active Directory Group Policy. The process consists of three steps:
- Identifying the Implicit user group and dividing them into 32 and 64-bit groups.
- Installing a pre-requisite: .NET 8.0 Desktop Runtime:
- Installing for Outlook add-in MSI file: 32-bit or 64-bit which you’ve received from Implicit.
CRM Admin Installation
Installing Implicit FrontEnd Module on the CRM Server
The purpose of the Implicit FrontEnd Extension Module is to enable CORS on your CRM. For the Implicit app to work inside Outlook or in a browser, CORS must be enabled on the CRM server. Cross-Origin Resource Sharing (CORS) is a security mechanism that is required in order to overcome the same-origin policy, enforced by Web browsers which prevents a scripts loaded from one domain from accessing another domain.
Based on your CRM, click the link below to download the Implicit FrontEnd Extension Module:
To install, please follow these steps:
- Login to your CRM, select the admin section and go to ‘Module Loader’
- Click ‘Choose File’, select “Implicit FrontEnd Module” zip file, and click ‘Upload’.
- The module will be uploaded and show up on the bottom list. Click ‘Install’ to install the module on your CRM instance
SuiteCRM:

SugarCRM:

Installing SuiteCRM Patches
If you are using SuiteCRM version 7.12.x and higher – You’ll need to apply the following patch. This patch is required for Implicit FrontEnd to connect with SuiteCRM via web services and for Single Sign-On SAML authentication to work.
Please see: https://crmcollaboration.com/docs/known-issues-suitecrm/
Managing Configurations for your CRM users
License, CRM URL and SSO Configuration
License key, CRM URL and single sign on settings are automatically configured when you place your order with Implicit or at the time when your corporate license is created. They are configured on the Implicit licensing portal and are automatically retrieved when users select “Load My Configuration”.
Implicit FrontEnd Desktop App Configuration
Implicit FrontEnd desktop app allows you as a CRM administrator to create and publish a configuration for your Implicit users. It includes four sets of configurations:
- Synchronization Configuration
- Corporate-Level Email Archiving Rules
Synchronization Configuration
These settings can be configured by either the CRM admin or by users:
- Auto sync on/off and interval
- Synchronization settings for: meetings, calls and contacts
For detailed information on how to configure meetings and contact synchronization, please see: Sync Configuration
Corporate-Level Email Archiving Rules
As CRM admin, you can create corporate-level email auto-archiving rules and publish them to all users. To create Email rules, see: Email Rules Engine.
Publishing Implicit FrontEnd Desktop App Configuration
Once you’ve configured the settings via the desktop app, you can publish the configuration by going to the administration tab and clicking ‘Publish My Configuration’. This will publish the configuration to a document on the CRM which will be automatically retrieved and applied to all Implicit users.

Implicit FrontEnd Add-In Configuration
The CRM administrator can also create and publish configurations for the Outlook side-panel. These settings are typically configured at the corporate level and apply to all CRM users. They include:
- Which CRM modules are accessible to users from Outlook
- Which CRM modules are visible on the Outlook side-panel
- Should browsing and searching for CRM records be done in Outlook or the CRM (browser).
- Rules for archiving Email attachments.
For detailed information on configuring the Outlook Add-in, please see: side-panel Administration settings
Configuring SAML Single Sign-On (Mac)
If your CRM is configured to use SAML-based Single Sign-On (SSO), you will need to enable SAML login via Implicit FrontEnd using one of the two following methods:
- If you are using Implicit FrontEnd on Windows and have installed Implicit FrontEnd Desktop app, you can skip this configuration. The desktop app supports SAML natively and no further configuration is required. Otherwise, please make sure to install and configure the Implicit FrontEnd Desktop app prior to installing the Outlook add-in as specified “Installing Implicit FrontEnd Desktop App.”) so SSO login will be enabled from the side-panel.
- If you are using Implicit FrontEnd on Mac, follow the instructions below to enable Implicit FrontEnd Add-in to use SAML to login to your CRM.
To enable SAML SSO without using the desktop app, you need to add a ‘Reply URL’ to your SSO provider (ID provider). Also known as an ‘Assertion Consumer Service (ACS) URL’, Reply URL is the location where the authorization server sends the user after the app has been successfully authorized and granted an authorization code or access token.
The method to add the Reply URL is specific to each provider. You will need to use your provider’s portal to add this URL. In the example below, we describe the method to add the Reply URL to Microsoft Azure:
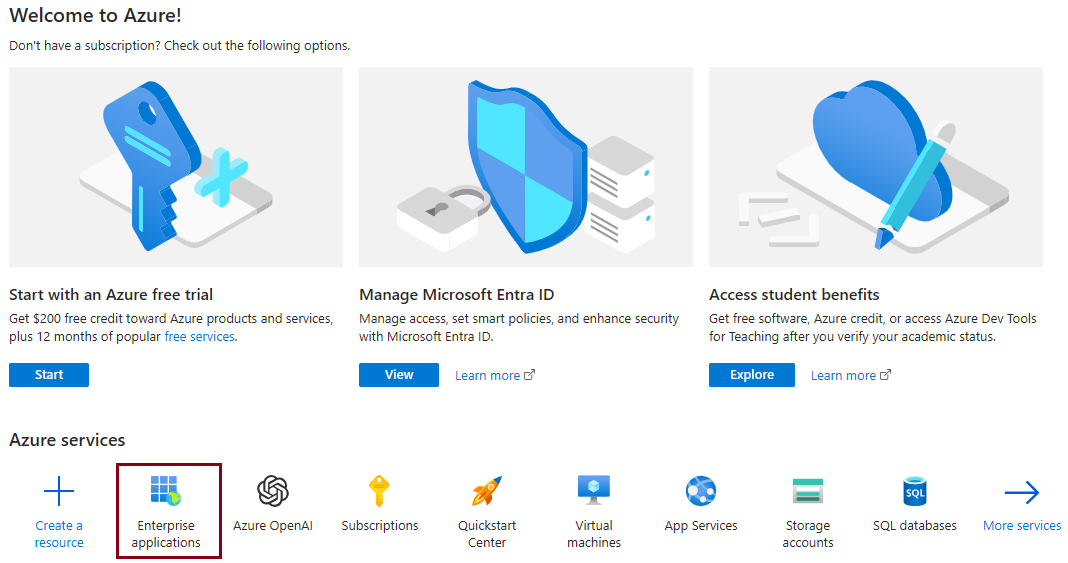
- Login as administrator to: https://portal.azure.com/
- Select “Enterprise Applications”
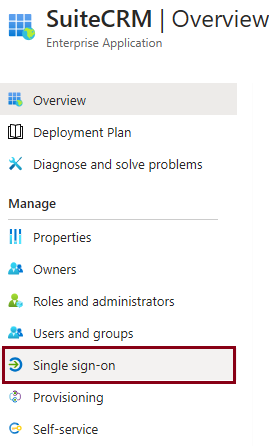
- Under “Enterprise Applications > All Applications”, find your CRM name: ”SugarCRM or SuiteCRM and select “Single sign-on” on the left-side menu:
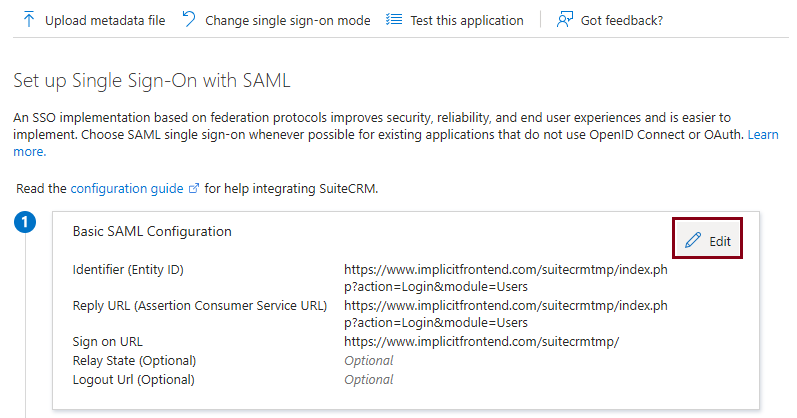
- On the “Set up Single Sign-On with SAML” card, click ‘Edit.
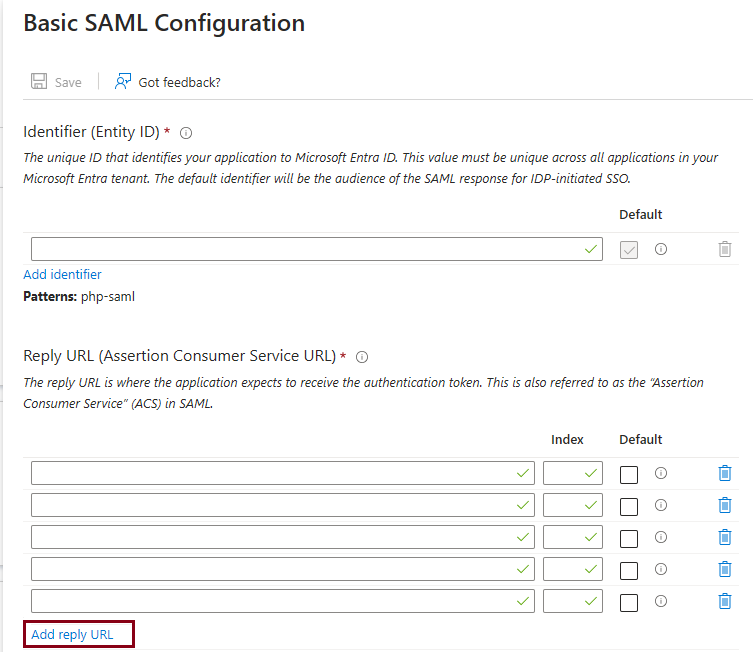
- “Basic SAML Configuration’ panel opens up on the right-side. Click “Add Reply URL” on the bottom and specify the Reply URL that was provided to you by Implicit along with your license key and the URL to install the add-in. When you’re done, click ‘Save’.
- To verify that SSO is working correctly, go to “Implicit FrontEnd add-in” login page, check the Single sign-on checkbox and click login. You’ll be prompted to login to your SSO provider and upon successful authentication, you’ll be able to login to the CRM.
- Next, select the users who will have access to Implicit FrontEnd and set the deployment method to ‘Fixed’.