Enabling and Preserving EWS Access in Microsoft 365
Purpose and scope
This guide is for the IT administrators of your corporate Microsoft 365 tenant. It explains how to restore Exchange Web Services (EWS) access if Microsoft has already auto-disabled it for your tenant, and how to configure your tenant so that it is not disabled until final retirement of EWS on April 1st 2027.
Before you start
Prerequisite: The following requires the Exchange Administrator or Global Administrator role.
To enable EWS you will need to use PowerShell with Exchange Online Management module installed. If you have not installed it yet, please do the following:
1. Go to Windows Start menu and type PowerShell
2. Click Ctrl + to run as administrator.
3. Enter the following command:
Install-Module -Name ExchangeOnlineManagement -Scope CurrentUser
Import-Module ExchangeOnlineManagement
Connecting to Exchange online
To connect run: Connect-ExchangeOnline
You will be prompted to enter your admin credentials.
Confirming current status
Before making any changes, check the tenant’s current configuration:
Get-OrganizationConfig | Format-List EwsEnabled, EwsApplicationAccessPolicy
Results:
EwsEnabled is:
• True – If EWS is allowed for the tenant (subject to app‑level policies).
• False – If EWS is globally disabled for the tenant
EwsApplicationAccessPolicy – A tenant‑wide policy that determines which applications are allowed to use EWS.
• EnforceAllowList – Only apps explicitly added to the AppID AllowList may use EWS.
• EnforceBlockList – Apps in the block list are denied; all others are allowed.
• None – No app‑level restrictions.
Retrieving list of Application IDs that are allowed to use EWS
Get-OrganizationConfig -RetrieveEwsOperationAccessPolicy | Format-List EwsAllowedAppIDs
This command will retrieve your tenant level Exchange Online configuration EWS operation access policy and filter the output to show only the list of AppIDs that are allowed to use EWS.
Adding Implicit App to the allowed applications list
Step 1 — Prerequisite: make sure the master switch is on
The Application ID allow list only matters if EWS itself is enabled at the tenant level — an allow list cannot override a tenant if EWS is fully switched off. Therefore, your first step is to turn EWS ON at the tenant level:
Set-OrganizationConfig -EwsEnabled:$true
This does not open EWS to every application – the allow list in Step 2 still restricts EWS to only the Application IDs you’ve explicitly added. This command simply clears the tenant from Microsoft’s automatic $true to $false switch (or reverses it, if your tenant already tripped the auto-disable).
One caution: setting this value to $false blocks EWS for every mailbox regardless of individual mailbox settings, so confirm nothing else in your tenant depends on EWS being off before you change it.
Step 2 — Append Implicit’s AppId to the existing allow list
Set-OrganizationConfig -EwsAllowedAppIDs @{Add=”<Implicit AppId >”}
This is the actual application-level control. EwsEnabled:$true alone is not enough — only applications whose Application ID appears on the tenant’s EwsAllowedAppIDs list may call EWS. Everything not on the list is rejected, regardless of the master switch.
Finding Implicit’s App ID
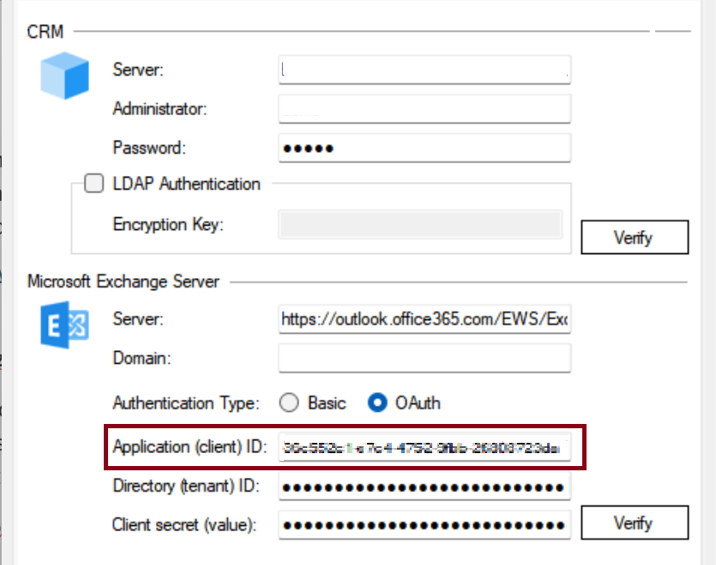
Implicit Exchange Connector AppID is defined in the first page of the configuration tool. You can copy the value of the application ID and paste it into the PowerShell command:
Step 3 — Verify
Confirm the settings took effect:
Get-OrganizationConfig | Format-List EwsEnabled
Get-OrganizationConfig -RetrieveEwsOperationAccessPolicy | Format-List EwsAllowedAppIDs
EwsEnabled should be $true, and Implicit’s Application ID should appear in the EwsAllowedAppIDs output.
Disconnect
Disconnect-ExchangeOnline